


 Select Store
 EU
EU
 UK
UK

(Previous Rooster Blog article from Oct 2015 - updated and restored)
For those of us who have been using the new 15:1 kicker for sometime - we may perhaps think that everyone has one. Well interestingly, a Gold medal was won using the old style system in recent 15:1 history.
Robert Scheidt I am sure was not restricted by a club rule that many of our clubs sailors have instigated - the less than £300 a boat rule. Well in case you have forgotten - or perhaps you fancy being a purist and are looking for a few grams of weight saving - here is our information sheet on how it should be done, together with the items you will need.
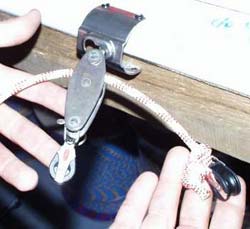
Attach the first micro ball bearing block such as a Harken 16mm air block or the Ronstan RF20101 to the bottom of the top block using a loop of Rooster Spectwelve or a shackle (I suggest a 5mm sail shackle as you can tighten it with a flat blade screwdriver..). Attach the other micro block to the end of the 6mm main line (suggest the 6mm Rooster AllSpecPro) and feed over the top roller of the top block . Next pass the main line through the top roller on the bottom jammer; and then back through the top hanging block.
Bottom Block then


Now the 3:1 part of the kicker needs to be fixed in order to enable us to make the unit 6:1 using only one line. This is essentially a neat knot around the bottom jammer block. Start by passing the tail of the line through the bottom hole in the cheek of the jammer.

Pass the tail around and behind the line to start the locking action (when under load the tension secures the line). Next you need to replicate this on the other cheek of the block.

Pass the rope around to the other side, and execute the previous move in reverse. Start by passing the line in between the cheeks and exit through the free hole in the side cheek.


Ensure that as the rope tail comes out from the cheek you use it to lock the 'round the block' part of the line.

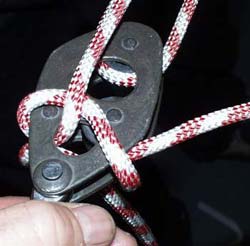
From this point adjustments to the length of the kicker (max off position is when the block is at the top of the key block) are easily made: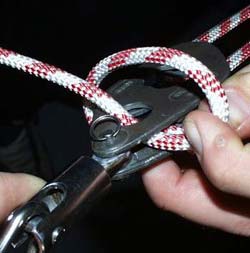
Now with the 3:1 locked, take the free tail of the line and pass it through the micro block at the top of the kicker...

...then down to the jammer...


Now that the length is set you can start a rope handle. We do this by making a quick release loop, and then passing another loop through it and continue till you have 10 - 12 inches of handle, making sure not to let the tail through the loops till your finished. To finish and secure the handle off pull the rope tail through the last loop.

Finish the handle by tying a bowline to make a loop. You should now have just enough tail left to tie to the centreboard handle - making the control line much easier to find when on the water.


